Hey everyone, it’s me, Dave, welcome to our recipe site. Today, we’re going to prepare a distinctive dish, vickys super mario cake decoration idea. It is one of my favorites food recipes. This time, I will make it a bit unique. This is gonna smell and look delicious.
Vickys Super Mario Cake Decoration Idea is one of the most favored of current trending meals on earth. It’s appreciated by millions daily. It’s easy, it is fast, it tastes yummy. Vickys Super Mario Cake Decoration Idea is something which I’ve loved my whole life. They’re fine and they look wonderful.
To get started with this recipe, we must prepare a few ingredients. You can have vickys super mario cake decoration idea using 14 ingredients and 72 steps. Here is how you cook that.
The ingredients needed to make Vickys Super Mario Cake Decoration Idea:
- Get Ready roll fondant icing in approximately :
- Prepare 150 g White + 100g for cake covering
- Take 150 g Brown
- Prepare 150 g Green + 100g for cake covering
- Get 100 g Red
- Get 50 g Yellow
- Prepare 40 g Blue + 200g for cake covering
- Make ready 30 g Skin tone
- Take 30 g Black
- Make ready small star cookie cutter
- Prepare small circle cookie cutter
- Get sharp knife
- Prepare edible ink pens in black, blue, red and green
- Make ready & patience!
Steps to make Vickys Super Mario Cake Decoration Idea:
- Dust your worktop with a bit of cornflour / cornstarch before you start. Roll out yellow fondant to around 3mm thick
- Using a small star shape, cut as many stars as you want. I chose 9 as my sons name has 7 letters and I'm going to write his name across them and have a couple spare just in case
- Use a circle cutter (I ended up using a bottle lid) to cut the coin shapes the same size. Cut as many as you want
- Use a smaller circle to indent the coins. I used a plain band ring lol. Then I used a 20p piece to indent the '1' onto each coin
- Set aside on some parchment paper to dry
- When dry, use a black edible ink pen to mark on the stars eyes. I used red and green to spell out my sons name too
- Roll out some brown fondant and cut into strips the same height and width as the stars and coins
- Cut into squares and using a sharp knife, mark brick shapes on them
- Make some yellow bricks the same way and roll out a thin snake of white fondant and fashion question marks for the yellow bricks. Stick on with a drop of water and set aside to dry
- To make the Goombas, roll more brown into ping pong sized balls and smaller brown balls for the feet. Mix some white fondant with a bit of brown to make a lighter shade of brown for the body and set aside a tiny ball of white and black fondant
- Shape the larger balls into the goomba head shape by twisting it around in your fingers on top of the work surface like you're turning a dial
- It should look like this when done, like a blunt pyramid
- Roll some small white fondant balls for eyes and use the back of a knife or your fingernail to give them grumpy faces
- Cut tiny triangles for teeth
- Then roll a thin snake from the black fondant to make the eyebrows and pupils for the eyes
- Flatten the feet slightly and make a short cylinder out of the lighter brown then stack them using a bit of water to act as glue, pressing down a little to help them stick. Set aside to dry
- Roll big balls from brown and form into cubes. Mark all over like the bricks and set aside to dry
- To make the Mushrooms, roll balls of red fondant and smaller balls of white. Roll some tiny balls too
- Flatten the red balls slightly and turn to shape as you did with the goombas. Form the larger white balls into cubes and flatten the small ones with a finger
- Stick the dots onto the red tops then sit those on top of the white stalks. Set aside to dry then draw the eyes on with a black edible ink pen. Make some mushrooms in green too if you like
- For Fire Flowers you need balls of red, slightly smaller in yellow and smaller still in white
- Flatten each and layer on top of each other (my yellow fondant was drying out badly by this time. I forgot to wrap it up while working on the Goombas….)
- Use green fondant to make the stalk and leaves as shown above
- The Piranha Plant is simply a circle of red rolled fondant, cut in half
- Use white to make the teeth, lips and spots then green for the stalk and pipe / pot
- Wet and stick together and set aside to dry
- To make Bob-ombs, roll out balls of black fondant and small balls of yellow for their feet. Sit the black ball on top of the yellow feet. Use white for the eyes and fuse. They're meant to be clockwork and have key winders on their backs but I opted not to bother with those
- I used a snowman shaped cutter to make clouds from the white fondant. It was the nearest shape I had and seemed easier than free-cutting them
- I trimmed them slightly to look more like clouds!
- Use more green in the same way for bushes / grass and extra piranha pots / pipes
- I also found a tulip cutter which I used the top of to cut grass shapes and a bell cutter which I used for hills by trimming off the bottoms and rounding the tops
- For Mario himself, start by rolling a ball of flesh toned fondant. Start the same way for Luigi. Do 2 smaller balls for noses and 4 even smaller for ears
- Roll 2 small balls of white and some black snakes for eyebrows and moustaches. Shape Marios face by pinching into a Goomba type shape
- Wet the eyes & moustache and stick on as shown
- Use tiny balls of blue or use a blue edible ink pen to fill in the eyes then wet and stick on the eyebrows and nose
- Luigis face is more of an oval shape
- They look like this when done
- Roll some blue into balls the same size as their faces and thick snakes for legs
- Wet and stick together and roll out balls of red and green for their chests
- Use trimmed cocktail sticks to support the bodies up through the legs and out the top and stick on 2 balls of brown each for shoes. Add snakes of blue for their dungaree straps and red / green for the arms
- Angle the sticks and stick on the heads. You'll likely need an extra stick for Luigi as he's taller
- Roll out a flat piece of brown for hair and stick to the back of their heads. Add 2 yellow buttons to their dungaree straps and add white balls to the end of the arms for their gloves
- Roll out a ball and a snall snake each of red and green for their hats
- Mould the snake around the slightly flattened ball to make the peak of the caps and add a small circle of white. Use edible ink for their initials
- Set aside to dry
- For Yoshi, roll out 1 short fat snake of green and a thinner snake in white
- Press the white onto the green and curve to form the body / tail
- To make his saddle use a ball of red and a smaller ball of white, flattened
- Wet and press together
- For the head you'll need these pieces
- Lay the red tongue on top of the white piece then stick the cheeks on top
- Wet and stick that on top of the green piece the same shape and roll around the cheeks
- Stick the eyes onto the green head piece
- Use black fondant or black edible ink to draw on the pupils and stick down to the jaw
- Roll a large green ball for his nose, wet and stick on
- Wet and stick on his red plates to the back of the head
- Secure the head to the body with a trimmed cocktail stick. You can see his size in comparison to my hand here. I wish I'd made him a bit bigger so bear that in mind when doing yours
- Roll some short green legs and mix some yellow & red fondant together to make orange balls for the shoes
- Position so the feet tuck under his chin and keep his head propped up. Secure with a trimmed cocktail stick across his body
- Roll out thinner green snakes for arms. I didn't bother making fingers as I was losing the will to live by now lol. Set Yoshi aside to dry
- Now all that's left to do is bake your favourite cake and assemble it!
- Here I've used my chocolate avocado cake recipe which makes a 2 x 8"layer. I swapped the cocoa powder out for a half measure of cornstarch, added a banana to the wet mix and reduced the water by 60mls as my son didn't want chocolate cake this time. I baked the whole recipe in a 9" square tin for 65 minutes then repeated the recipe to make the second layer. I added chopped glace cherries to the bottom layer and trimmed the cakes to even them up
- I used 100g Stork gold foil-wrapped margarine, 200g icing sugar, 1 tsp vanilla extract and 2 tbsp coconut milk to make buttercream which I used to sandwich the 2 cakes together and thinly skim the whole of the outside
- I rolled out the rest of the blue fondant I had left - around 200g - and kneaded in around 50g white to lighten it before rolling it out large enough to cover the top layer and a bit more
- Smooth the corners down first then smooth the sides in. Trim off the excess so around 3/4 down the sides is covered
- I mixed my remaining green and white to make a paler green then formed into a long snake before rolling out
- I rolled it out to the length of 2 sides of the cake then cut it in half horizontally. The uneven edges act like grass / bushes so don't trim the top and bottom straight. You can place the joins anywhere as the scenery shapes will cover them
- Position on the cake, wetting where it overlaps the blue to help it stick. We'll cover the joins with some of the shapes we cut out previously
- Now add the embellishments wherever you want, wetting the back of each lightly and holding on gently for a few seconds until stuck
- Use as many as you like. I only used 2 cloud shapes and 4 grass bush shapes out of all I made but you could of course make another snaller tier!
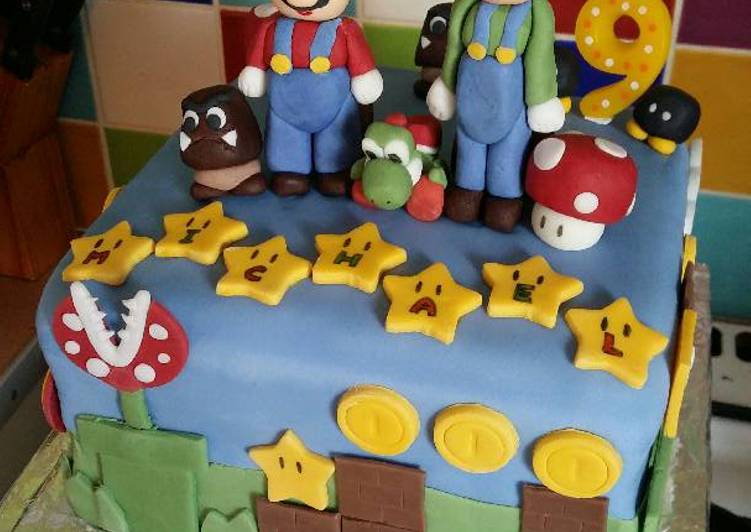
- Add the figures and you're done
- I found star shaped candles in my birthday stash to finish it off
So that is going to wrap it up for this exceptional food vickys super mario cake decoration idea recipe. Thanks so much for reading. I am sure that you will make this at home. There is gonna be interesting food in home recipes coming up. Remember to bookmark this page in your browser, and share it to your loved ones, colleague and friends. Thanks again for reading. Go on get cooking!